Comprehensive Guide to Setting Up Large Interactive Touch Walls on Two-Cornered Surfaces
Transform your walls into a breathtaking, immersive interactive experience.
🤑 DIY and bypass tens of thousands in expensive software integration fees with this guide!
InfinityWall Setup Guide Overview
Introducing the InfinityWall, an innovative interactive display system that transforms any wall into a dynamic, touch-sensitive experience. Featuring two seamlessly blended surfaces powered by dual projectors, this L-shaped setup creates a continuous, immersive canvas that wraps around corners with stunning clarity and responsiveness.
With a DIY approach, you can achieve a professional-grade setup at an estimated hardware cost of under S$9,000, a fraction of what traditional integrated solutions would demand. InfinityWall makes immersive environments both achievable and affordable.
Perfect for indoor playground learning or creative spaces, the InfinityWall combines projections with intuitive interaction, offering a versatile solution that maximizes space and captivates audiences. Elevate your environment with a display that feels limitless.
Use case of InfinityWall:
- 1Indoor Playground and Amusement Park
- 2
Exhibition Hall Events
- 3
Shopping Mall Interactive Experience
- 4
Interactive Learning Classroom for Schools
- 5
Childcare and Children’s Therapy Centers

Figure: InfinityWall Overview
How InfinityWall Works
The concept behind InfinityWall is simple yet innovative. Imagine wanting a massive 400-inch TV for your home, a size that’s not available in retail stores. Instead of purchasing an impractical TV, you can use two projectors to project images onto two walls arranged side by side. These projectors are connected to your PC via HDMI cables, and the screens from both projectors are combined into a single display on your PC.
Now, to make the projection interactive, we add touch functionality. Instead of using a traditional mouse, the wall itself becomes a touchable screen. This is achieved by installing two laser emitters above the projected area. These emitters cast an invisible laser beam onto the floor, creating a “laser curtain.” When a finger touches the wall, it interrupts the laser curtain, causing a reflection.
This reflected laser is captured by an infrared camera attached below the projectors. The camera detects the touch location and sends this information to the PC, which simulates a mouse click at that point on the projection. This process transforms a simple projection into an interactive, touch-sensitive surface, allowing you to control the screen with your finger, just like using a touchscreen device.
List of Hardware Required
These are list of essential hardware required for the setup. General items such as USB cables are not included this list but will be mentioned in the installation steps.
| No | Item |
|---|---|
| 1 | Ultra Short Throw Projector (2 units)
Ceiling or wall mounted ultra short throw projector of any notable brands. Both must be the exact same brand and exact same model. The throw ratio is recommended to be 0.2:1 to 0.4:1. The smaller the throw ratio, the larger the projected screen. You can calculate what throw ratio is suitable for your wall using the formula: Throw Ratio = Projection Distance / Image Width Projection distance is how far the wall from the lens of the projector. Image width is the width of projection. Example: Optoma GT3500HDR, BenQ V5000i, Epson EpiqVision Ultra LS800 |
| 2 | Windows PC with supported graphic card that has at least 2 HDMI ports. (1 unit)
The PC can either be a tower PC or a mini-PC, depending on your preference for placement. You can position it in a server rack with a lock, on a table, or even mount it on a wall. For Intel-based PCs, the CPU should be at least an Intel Core i7 to meet performance requirements. For AMD-based PCs, the CPU must be at least an AMD Ryzen 7. Brand: Any reputable PC brand offering high-performance models. A high-performance PC is essential to support dual HDMI outputs and run CPU-intensive applications smoothly. Supported graphics cards with multi-display merging capability:
|
| 3 | Laser emitter and infrared sensor camera. This is the laser curtain device. (2 sets)
Each side of the wall requires a laser emitter and an infrared sensor camera. See the link below on the product detail and the website to purchase. The purpose of these devices are to create a laser curtain. When a finger touches the wall, it interrupts the laser curtain, causing a reflection. This reflected laser is captured by an infrared camera attached below the projectors. The camera detects the touch location and sends this information to the PC, which simulates a mouse click at that point on the projection. Device Model Name: Gloview FP4 Board Manufacturer product website: http://www.easitech.com.cn/en/Product/ltproduct/238.html |
Installation and Measurements
1) Projectors Mounting
Important: Hire a professional projector installation vendor to mount the projectors as it requires drilling and accurate mounting position.
For each side of the wall, mount the projector right above and center of the screen. The projector can be wall mounted or pole mounted.
Example: Screen width = 2 meters
Projector throw ratio = 0.27
Distance of projector lens to wall = Throw Ratio * Image Width = 0.27 * 2 = 0.54 meter
Determine the mounting position of the projector from the wall based on how large is your screen. The formula is:
Projection Lens Distance From Wall = Throw Ratio * Image Width
Upon installation, connect the projector to the power source and adjust keystone where necessary. Make sure both projector screens are aligned next to each other with minimal overlap. Connect the projector to the PC using a HDMI cable.
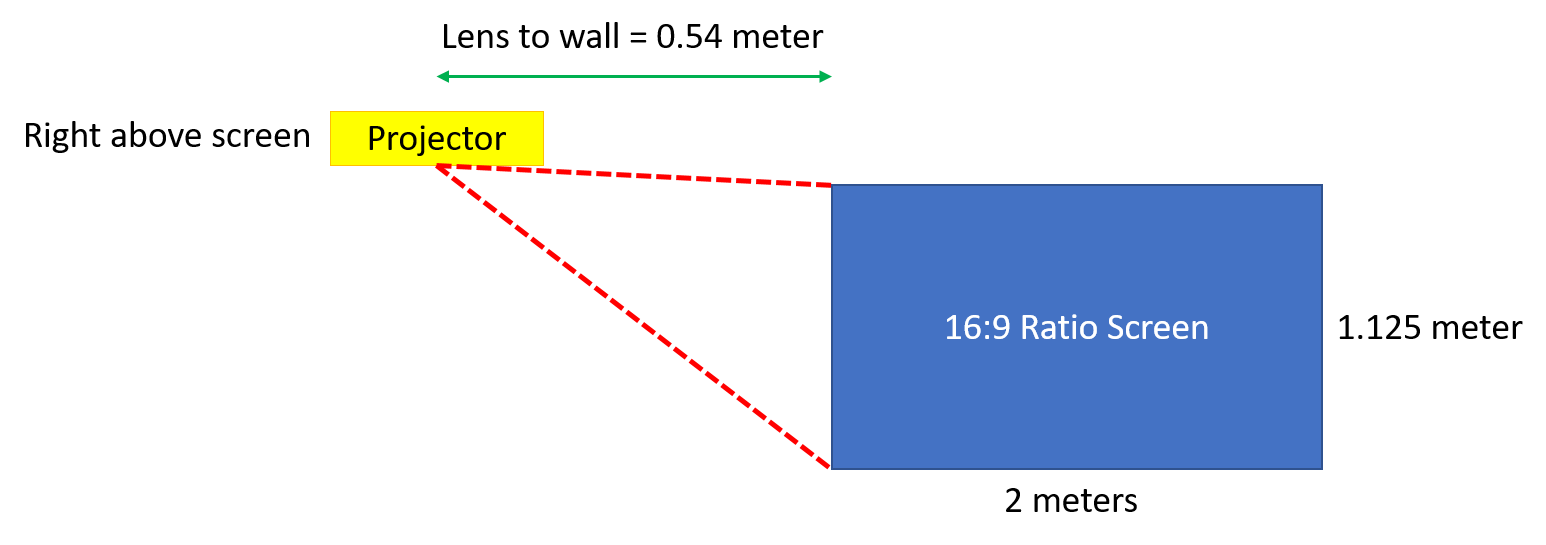
Figure: Example of projector setup measurement.
2) Infrared Emitters (Laser Curtain)
This section will guide you on the position of the emitter and the logic behind the setup.

Figure: Infrared emitter and camera
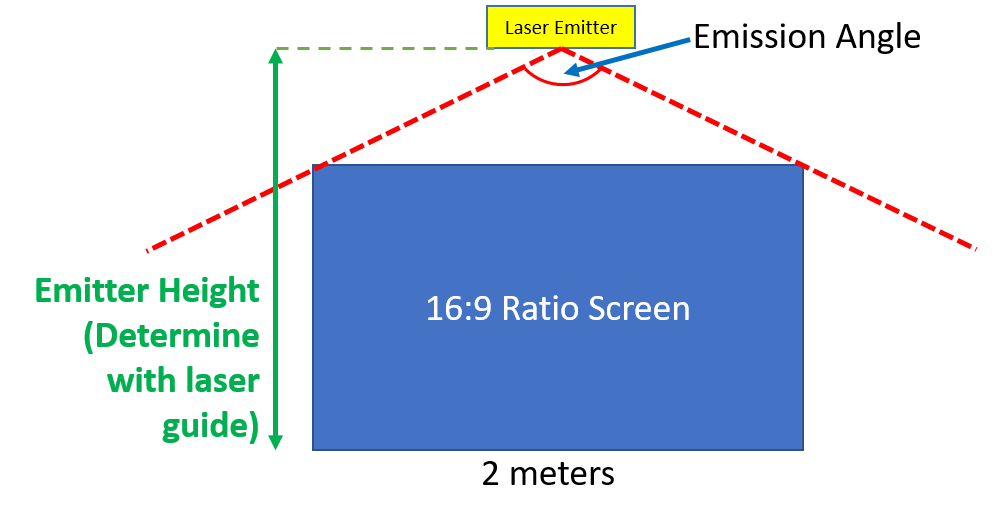
Figure: Height of the laser emitter
The laser emitter is beaming out laser in a fan shape. The beam V-shape has to cover the whole screen so the whole screen will be touchable. See image above.
To begin, carefully pry open the emitter white casing. This will reveal the switch button and screw-knob. The switch button is to turn on visible red-light that will beam out a straight line to to the floor. This line is a guide to help you aligning the laser near to the wall and to test if the screen is within the emission angle (image above). The screw-knob is to adjust the tilting of the emitter so you will be able to move the laser curtain as near to the wall as possible. If the emitter has a second knob, you can use it to roll the emitter laser to the left and right.
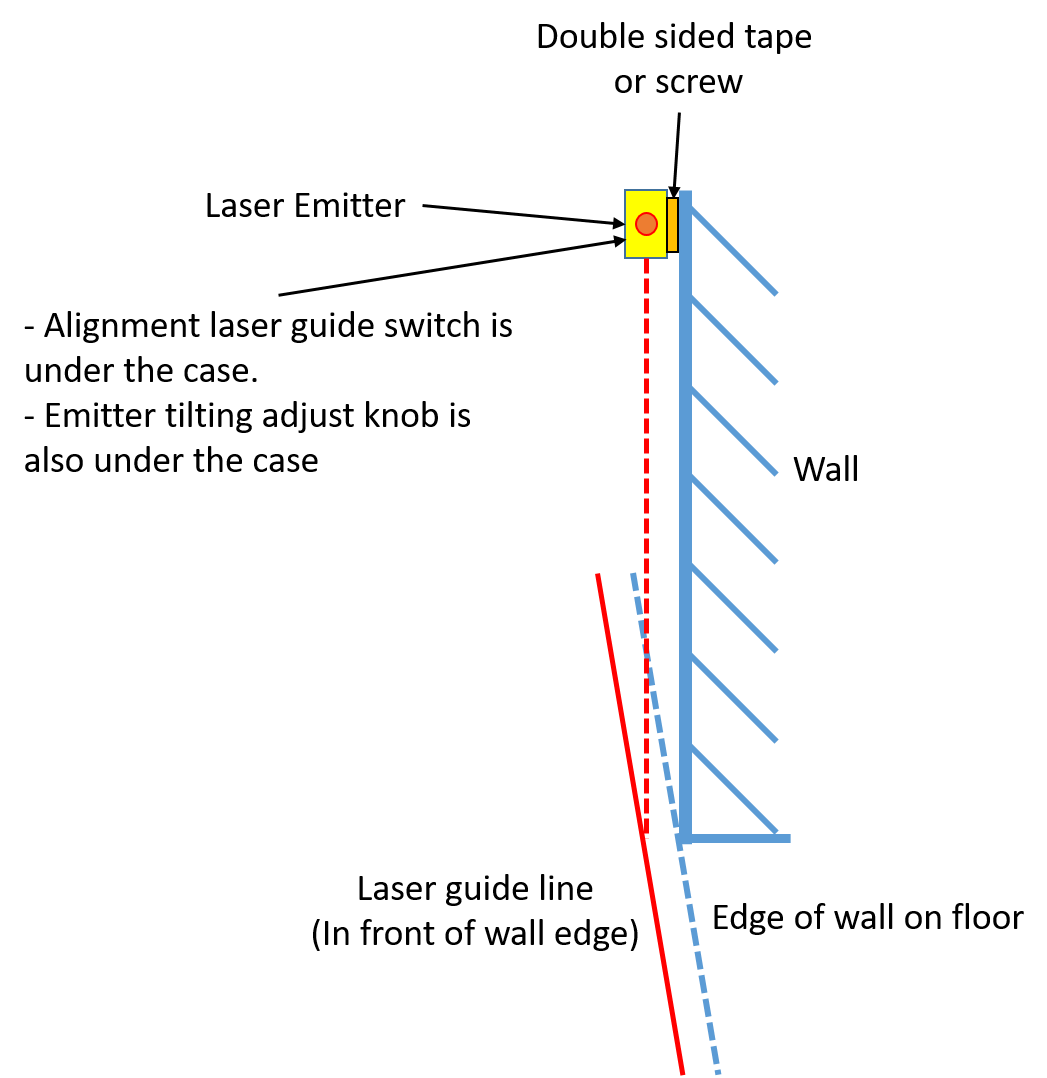
Figure: Laser curtain alignment
Two people are required to complete the installation. Start by connecting the power cable to the laser emitter and switching on the power. Press the button on the emitter to activate the red guide line. To determine the optimal mounting height, one person should hold the emitter above the screen and press against the wall while the other touches each of the four corners with their finger. The red guide line should be clearly visible on the fingertip at all corners. Gradually adjust the height of the emitter, aiming for the lowest possible position where the guide line remains visible on the fingertip at all four corners. Once the ideal height is identified, secure the emitter in place. Do not close the white cover yet, as you will need to adjust the tilt later to eliminate reflection noise from the wall.
To secure the emitter, begin by using double-sided tape to temporarily attach it to the wall. This allows for easy adjustments during the initial setup of InfinityWall. Once the setup is complete and you are certain of the screen size and emitter placement, you can permanently fix the emitter using long screws for a more stable installation. Note that double-sided tape may not be suitable in environments with frequent temperature fluctuations or when mounting on soft partition walls, as such conditions can cause the emitter to shift or tilt over time.
Once the emitter has been secured, use a screwdriver to turn the tilt-knob. When you turn the knob, you will be able to move the laser guide line nearer or farther away from the screen. Keep the laser guide line around 1 inch from the wall. We will further adjust this in the later step. Do not switch off the laser guide or close the white cover yet.
3) Infrared Sensor (Camera Module)
This section will guide you on the position of the infrared camera setup.
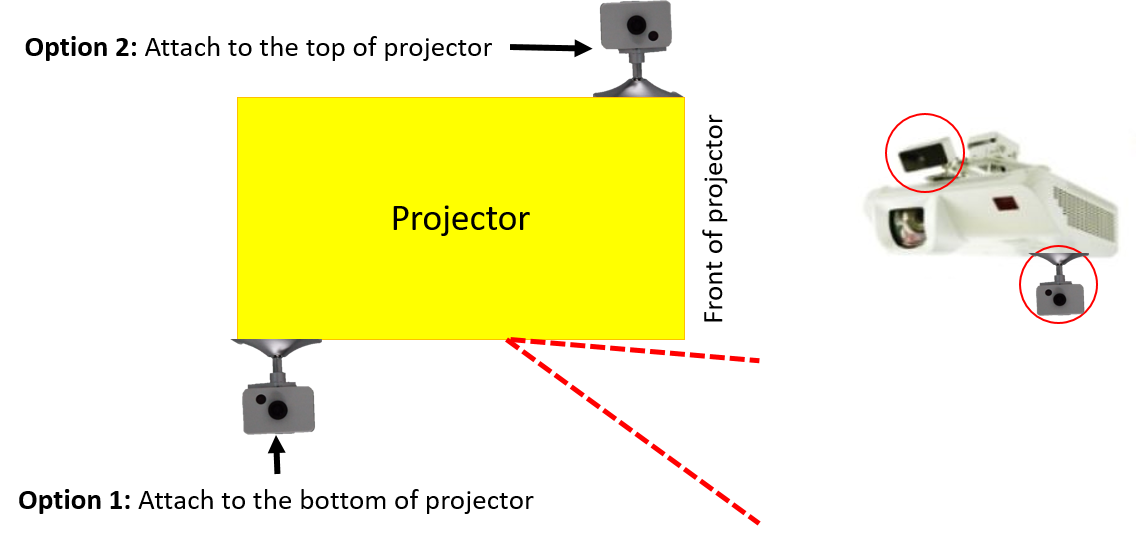
Figure: Infrared camera placement
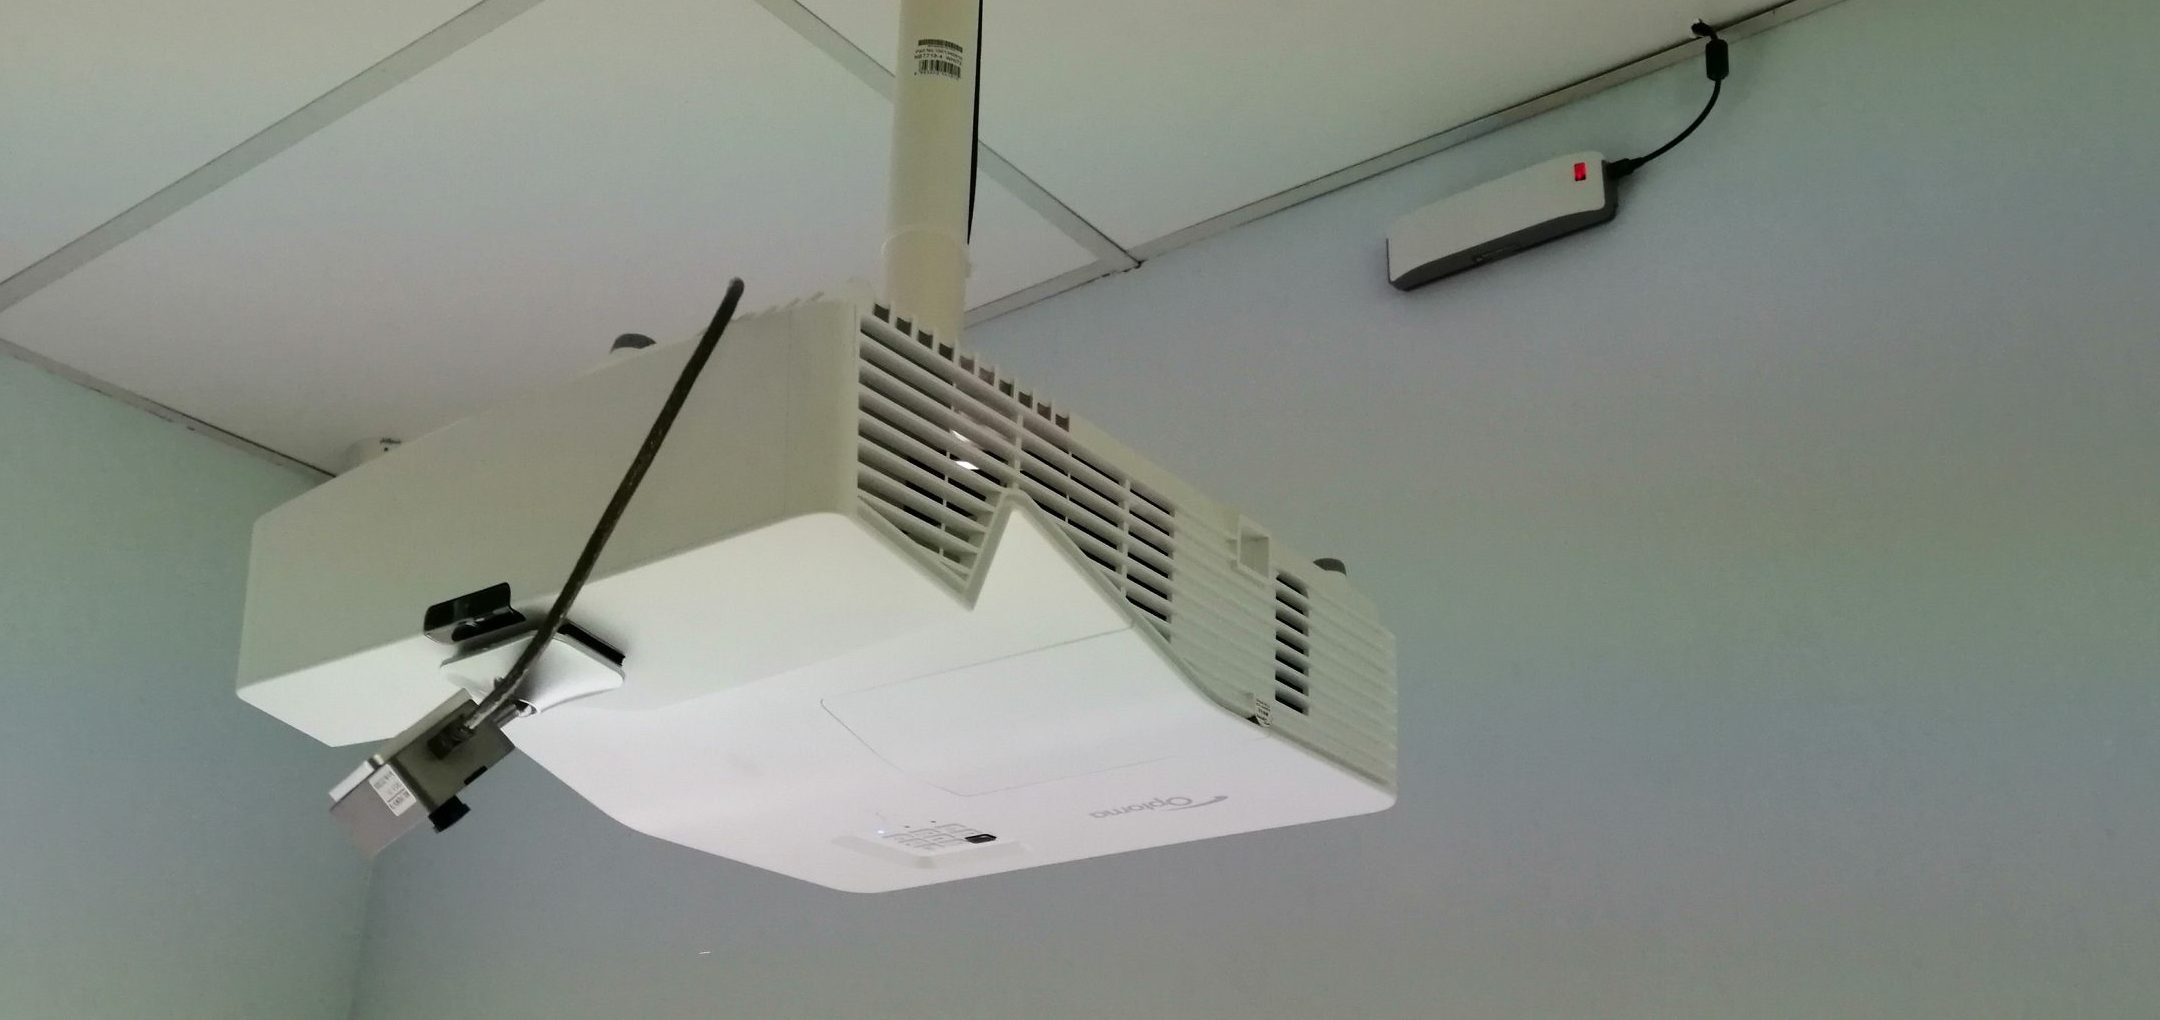
Figure: Infrared camera placement example
The installation of infrared camera is straightforward. To begin, attach the camera to its base. Then, connect the USB cable to the camera and the other end of the USB cable to the PC. After that, connect the camera to the power source.
Using double sided tape, attach the camera base to the projector. You can attach it to the downward facing side of the projector behind the lens. Or you can also attach it to the top of the projector at the front of the projector. As long as the camera is not blocking the projector lens and have full view of the screen, you can place it anywhere on the projector. Turn the camera to face the screen.
4) Windows PC
Connect the PC to the power source. Connect the 2 USB cables from infrared camera and 2 HDMI cables from the projectors. Depending on your preference and safety requirement, you can place your PC inside a PC rack, hang it on the wall, mounted on the ceiling or concealed in another room.
PC Configuration
This section describes software configuration in the PC for the projectors and infrared camera calibration.
1) Setup Projectors Display
Once the projectors are connected to the PC, make sure you are able to see the Windows desktop on the screen. You will now set the display to be extended mode and in the correct arrangement. If you need help on how to change the mode, search for online article or video guide.
2) Merging Projectors Display
To merge 2 projector display into a single logical, large virtual display, we will be using NVidia Mosaic or AMD Eyefinity, depending on which graphic card your PC has.
NVidia Mosaic Guide
Video: https://www.youtube.com/watch?v=VVV1yr1nFNo
AMD Eyefinity Guide
Video: https://www.youtube.com/watch?v=ZkcAjtcOT4o
Website: https://www.amd.com/en/resources/support-articles/faqs/DH-014.html
For NVidia Quadro, you can also setup edge blending to enable a seamless visual blend between two projectors by overlapping 2 projectors.
3) Setup Infrared Camera and Touch Calibration
The infrared camera and laser devices come with a software CD. It has device driver for converting detected wall touches to mouse clicks and software for calibrating the infrared camera. Install this software. Upon installation, look for a software named “IWB”. Using IWB, look for “Split Screen” mode. Enable this mode to allow 2 infrared cameras to work together as one where each of them points to different wall. You will be able to view the camera live stream on the projection now. If the camera display order is not correct, right click and choose “exchange the image”. Adjust the camera position so that the projection fit into the red or green box as much as possible. See image below.
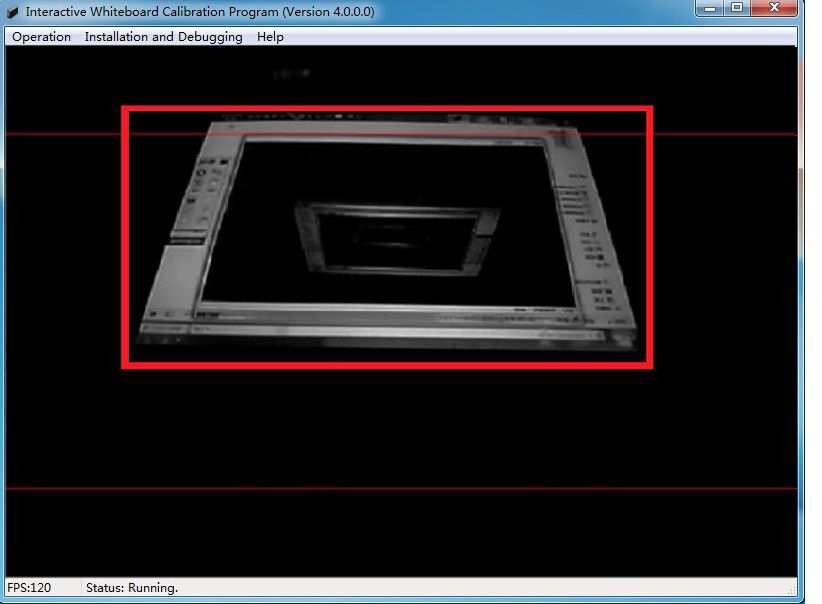
Next, we will calibrate the laser emitter to ensure the laser curtain is nearer to the wall surface but not touching uneven spots on the surfaces. From the software, select Installation and Debugging > Mode 2. You will now see invisible infrared captured by the camera. See image below.
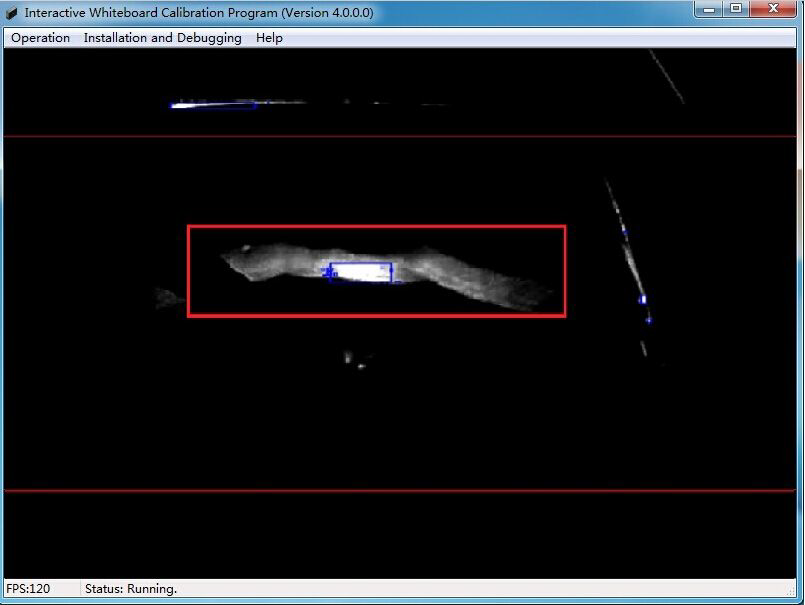
If you see white patches in the red or green box, these are noises caused by the reflection from the uneven wall surface. Adjust the tilt knob in the laser emitter until the white patches fades out. If the emitter has a second knob, you can use it to roll the emitter laser to the left and right. Once done, perform automatic calibration by clicking Operation > Auto Calibration. At this point, the camera calibration is complete. Press the emitter red guide line to turn it off and close the white cover.
Look for “Auto Run At System Startup” in the IWB software or IWB icon at Windows taskbar icons. Enable this setting. Restart the PC to test the wall touch functionality and ensure it works correctly upon every reboot.
4) (Optional) Center Alignment and Edge Blending of Dual Projectors with Immersive Display Pro
If your projector screens is not aligned nicely next to each other such as one side of the projection is higher or lower than the other, you can perform geometric correction using Immersive Display Pro (IDP). You can also use IDP to pair with Nvidia screen overlapping feature for edge blending.
User manual for IDP: https://fly.elise-ng.net/wp-content/uploads/documents/display/ImmersiveDisplayPROUserGuide.pdf
Video guide for IDP: https://www.youtube.com/watch?v=uvHEDmdxXCE
Need Custom App For InfinityWall?
Once your InfinityWall setup is complete and you are ready to add interactive features to your touch wall, you can reach out to us for custom interactive app development. We offer affordable services to create engaging, dynamic experiences tailored to your specific needs. Whether your goal is education, entertainment, events, or interactive exhibitions, we can help you design and develop applications that elevate the interactive potential of your InfinityWall. From playful activities to immersive storytelling or branded engagement tools, we will work with you to bring your vision to life. Get in touch today to explore how we can transform your InfinityWall into a truly interactive experience.
Need Help?
Need assistance with setting up or troubleshooting your InfinityWall? Click the Get Help button below to access our support form. Whether you need setup guidance, or technical support, our team is here to assist you. Simply send us a message, and we’ll get back to you as soon as possible!
Disclaimer
This guide is provided as-is, without any warranty, and requires technical skills for proper setup. SchoolApp.sg has no affiliation or benefiting from the external links and products mentioned in this page.

